How To Use CapCut’s Masking Tool: Basic To Advanced – Steps by step Guide
In This Article I Am Going To Show You How To Use How To Use CapCut’s Masking Tool: Basic To Advanced, Want to add professional effects to your videos using CapCut? The Masking Tool makes it easy for beginners to hide, reveal, or blur parts of your video.
In this guide, you’ll learn step by step guide how to use the Masking Tool in just a few steps.
Whether you’re a content creator or new to video editing, mastering this feature will help you create more dynamic and engaging videos.
By the end, you’ll be ready to apply masks like a pro and elevate your edits using CapCut’s simple yet powerful tools.
What is the Masking Tool in CapCut?
Masking in video editing is like using a flashlight to light up certain parts of your video while keeping the rest dark.
It helps you show only what you want people to notice or lets you add cool effects.
Types of Masks in CapCut
CapCut offers different masks to choose from.
- Shape masks: Simple shapes like circles and rectangles. You can use these to blur faces, highlight an area, or focus on something specific.
- Linear masks: These blend two parts of your video, helping create smooth transitions.
- Mirror masks: These reflect parts of your video, making it look symmetrical or adding a unique touch.
Masking can make your edits look polished. For example, you can hide an object or create a smooth scene transition.
It’s a simple way to add effects or draw attention to a specific area without using expensive software.
Why Use the Masking Tool?
Masking isn’t just for professionals. Here’s why anyone can use it.
1. Improves Your Storytelling
Masking helps you control what viewers focus on, making it easier to tell your story.
You can blur the background or other distractions to highlight the main subject.
2. Adds Cool Effects
You can create fun visual effects without needing extra software. For example, you can blur a face or make one part of the video stand out easily with masking.
3. Gives You Precision
Masking lets you decide exactly what to show or hide, giving you complete control over your video and making it look more professional.
Step-by-Step Guide: How to Use the Masking Tool in CapCut
Let’s go through how to use the Masking Tool in CapCut step by step.
Step 1: Open CapCut and Import Your Video

First, open CapCut and start a new project. Import your video by tapping the “+” button and choosing your file.
Step 2: Find the Masking Tool

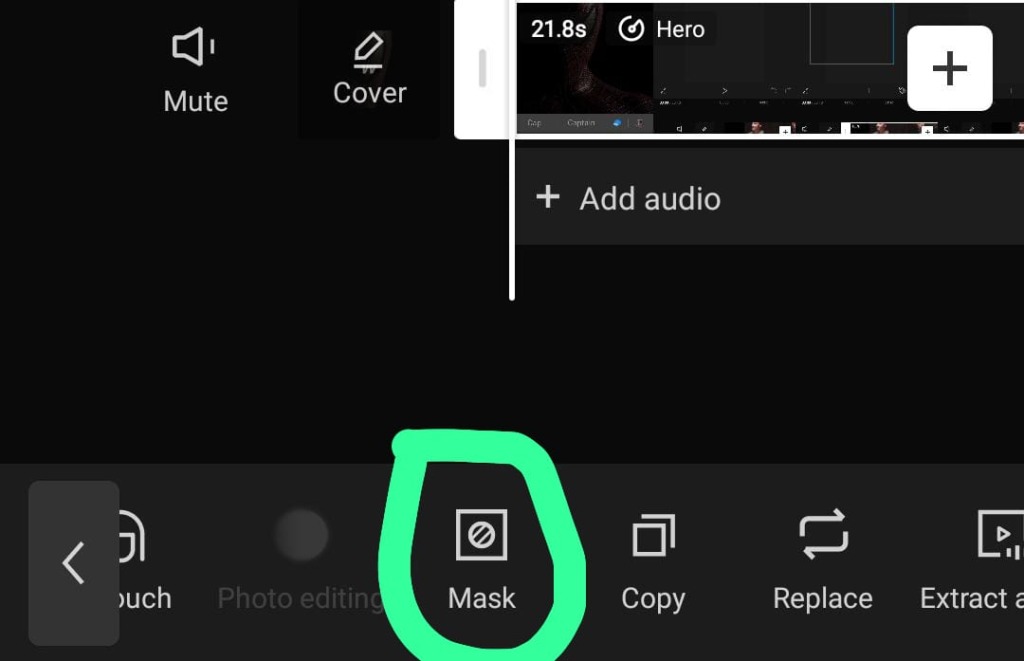
After your video is on the timeline, tap the video clip. Scroll through the bottom menu until you find “Mask.” Tap it to access the Masking Tool.
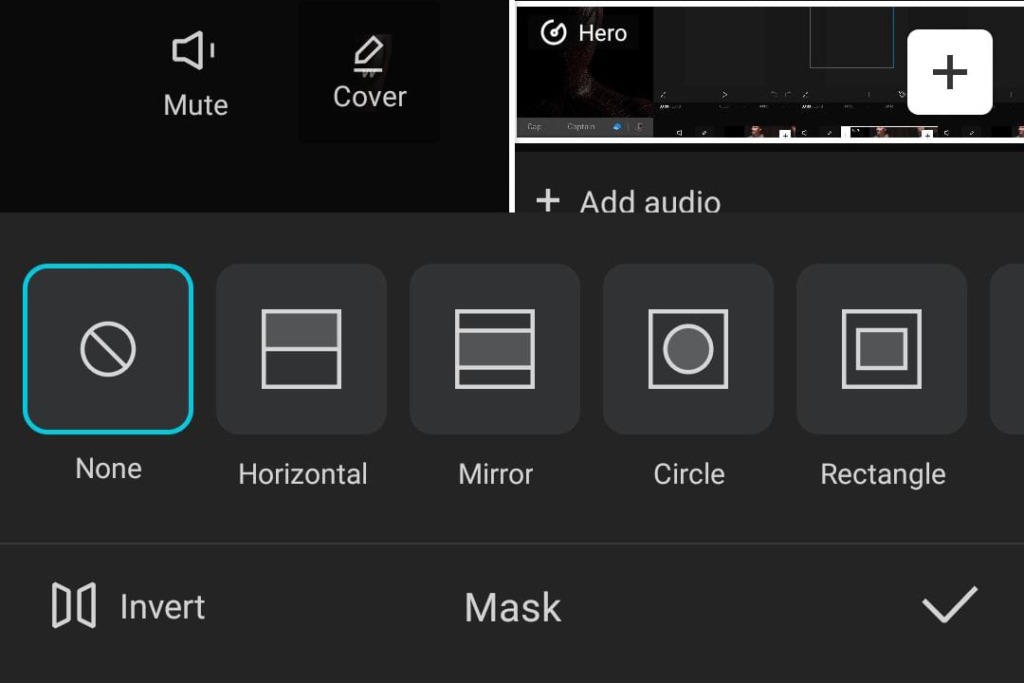
Step 3: Pick a Mask Shape

CapCut gives you different mask shapes like circles, rectangles, and linear masks. Pick the one that suits your video.
For instance, to highlight a face, a circle mask might work best.
Step 4: Adjust the Mask

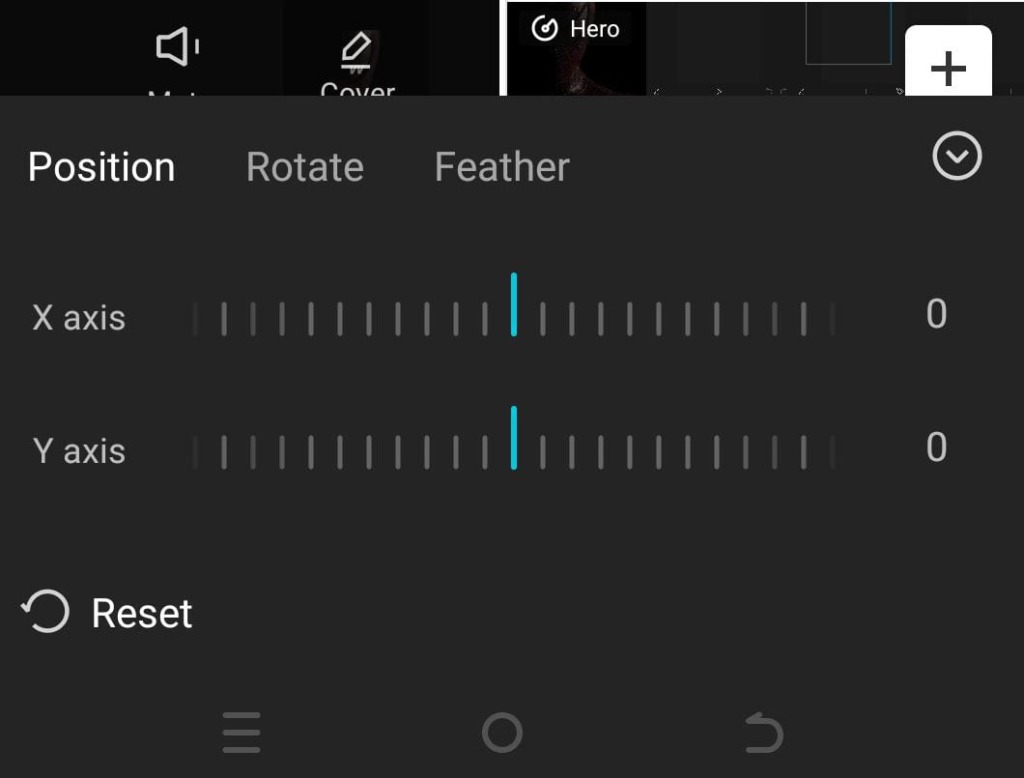
Move, resize, or rotate the mask to fit your video. You can also soften the edges with the feather option, making the mask blend more smoothly.
Step 5: Combine Multiple Masks
You can use more than one mask for creative effects. For example, put a rectangle mask on one part of the video and a circle on another to create a unique look.
Step 6: Preview and Export Your Video
When you’re happy with the masking effect, hit play to preview your video.

If everything looks good, tap “Export” in the top-right corner and save it in High Quality.
If you want to make your video more High Quality or HD,/4K you can use CapCut’s HD Templates.
Advanced Masking Tips
Once you’ve mastered the basics, try these advanced tricks.
1. Layer Masks
You can use more than one mask to create complex effects, like showing multiple things at once.
2. Mask Transitions
Move the mask as the video plays to create smooth scene changes. This makes your video flow better.
3. Masking with Green Screen
If you’re using a green screen, combine it with masking to remove backgrounds or add interesting overlays. (Learn How To Use CapCut’s Green Screen)
Common Masking Mistakes and Fixes
Masking is simple, but watch out for these common mistakes.
Misaligned Masks
Make sure the mask is lined up correctly with the area you want to focus on, or your video will look off.
Sharp Edges
If the mask edges are too sharp, it will be obvious. Use the feathering option to soften the edges.
Not Checking Different Screen Sizes
Always check how your masked video looks on different screen sizes. What looks good on a phone might not look right on a bigger screen.
Fun Masking Ideas in CapCut
Now that you know how to use the Masking Tool, try these fun effects.
1. Split-Screen
Show two different clips side by side for comparisons or different angles.
2. Hide and Reveal Objects
Use masks to hide objects and reveal them at the perfect moment for a surprise.
3. Creative Transitions
Make scene changes stand out by using masking to fade in and out creatively.
4. Combine Masking with Speed Changes
Speed up or slow down parts of your video and use masking to focus on the action. This adds energy to your video.
FAQ – Common Questions About CapCut Masking Tool
What are the different types of masks in CapCut?
Custom Shape: You can draw your own mask shape using the freeform option.
How do I animate a mask in CapCut?
Can I apply multiple masks to the same clip?
How can I fix a poorly aligned mask?
Conclusion
CapCut’s Masking Tool is an easy yet powerful way to improve your videos.
Whether you’re new to video editing or more experienced, masks can help you tell better stories, add effects, and make your edits look more polished.
Now that you know how to use it, go ahead and have fun experimenting with masking in your next project!


