If you’re new to video editing and want your videos to look cool, speed ramping is a great trick to learn!
This technique helps you change how fast or slow your clips play to make important moments stand out or create smooth transitions.
In this easy guide, you’ll learn how to use CapCut’s speed tool to make your clips go slow or fast. Whether you’re making vlogs or action videos, knowing how to speed ramp will make your videos more exciting.
Are you ready? Let’s get started!
What Is Speed Ramping and Why Use It?
Speed ramping is a fun video editing trick where you slow down or speed up parts of your video.
It’s great for making important moments stand out or speeding through boring parts.
For example, you can slow down a big jump in a sports clip to make it look more exciting, then speed up the rest to keep the action going.
CapCut is a popular video editing app that helps beginners use speed ramping easily.
The speed tool and curve speed tool let you control how fast or slow your video plays at different times, making it look smooth and professional.
Step-by-Step Guide for Creating Speed Ramp Edit in CapCut
Here’s how to create a speed ramp edit in CapCut from start to finish:
Step 1: Open CapCut and Start a New Project

- Open CapCut and click on “New Project”.
- Select the video clip you want to edit from your gallery.
Step 2: Find the Speed Tool

Tap on the video in the timeline to select it.

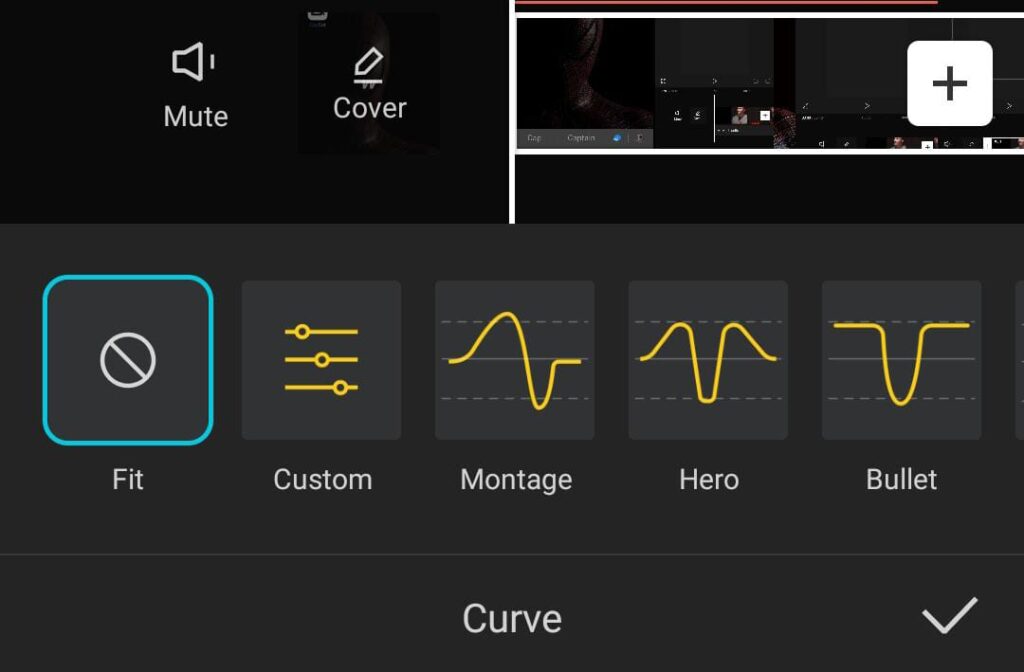
At the bottom of the screen, tap on “Speed”. You will see two options: Normal and Curve.
Step 3: Choose the Curve Speed Tool

- Select “Curve” for advanced speed ramping. CapCut offers presets like “Hero”, “Bullet”, and “Flash”. These presets automatically adjust the speed at different points in the video.
- If you want full control, choose “Custom” to adjust the speed at specific points in your video manually.
Step 4: Customize the Speed Ramp

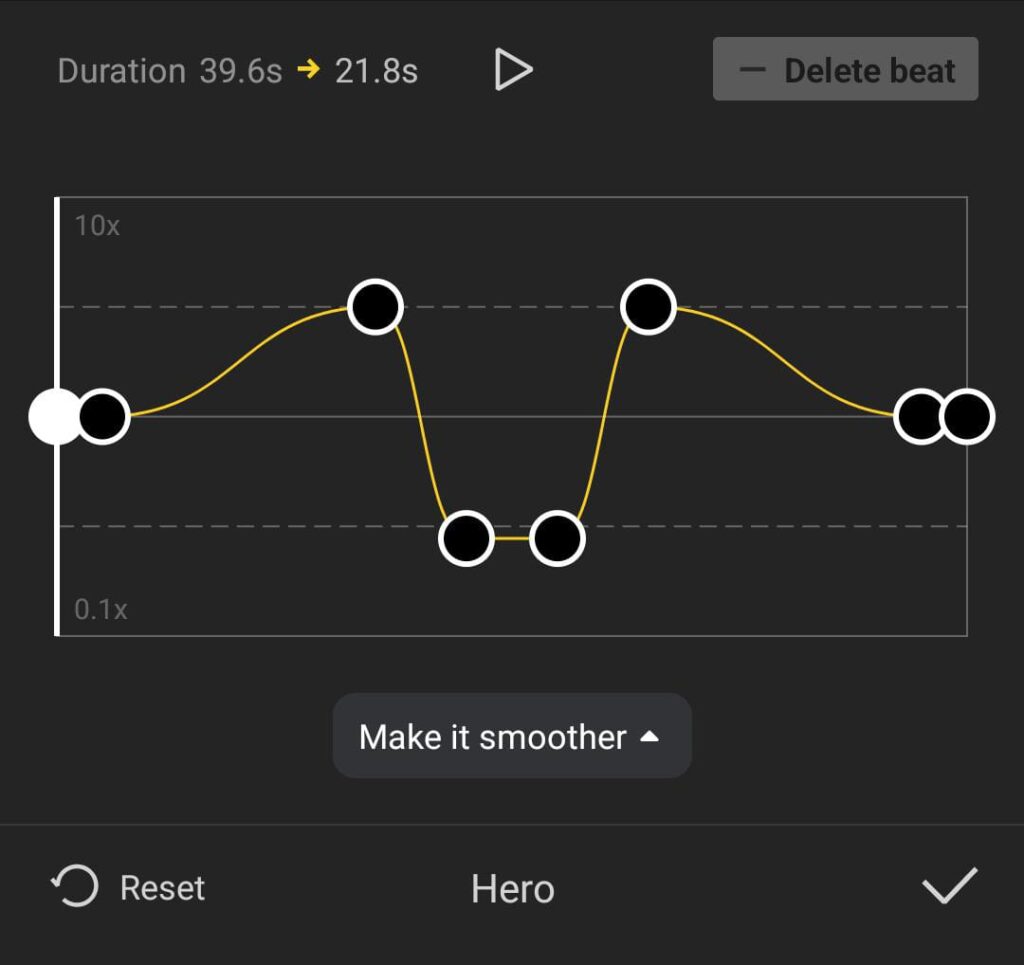
- In “Custom” mode, you’ll see a graph. You can add points to the graph to make parts of the video faster or slower.
- Drag the curve up to speed up a section.
- Drag it down to slow down a section.
- Create multiple points to make different parts of the video change speeds smoothly.
Step 5: Preview and Adjust
- Tap the play button to preview how your speed ramp looks.
- Adjust the curve to make sure the transitions between slow and fast parts are smooth.
Step 6: Sync with Sound (Optional)
- If you have background music, you can match the speed changes to the beat. Just tap the audio track and adjust it to line up with your speed changes for a more polished video.
Step 7: Export Your Video

- Once you’re happy with the edit, tap “Export” at the top of the screen.
- Choose the resolution and frame rate, then save the video to your device. Now your speed ramp edit is ready to share!
Pro Tips for Speed Ramping
- Timing: Make sure your speed changes happen at key moments. For example, slow down just before a big action scene or transition.
- Use Presets: If you’re new to speed ramping, start with CapCut’s presets like “Hero” or “Flash” to quickly apply speed effects without too much effort.
- Smooth Transitions: Don’t let the speed changes be too sudden. Adjust the curve gently for smooth transitions between fast and slow sections.
- Combine with Effects: Speed ramping works well with other effects like slow motion or fast forward. This can make your video more dynamic and fun to watch.
Best Times to Use Speed Ramping in CapCut
Here are some great times to use speed ramping:
- Vlogs: Use speed ramping to create fun transitions between scenes, like speeding up a travel section or slowing down an important conversation.
- Action Videos: Slow down fast moments to highlight exciting parts like jumps or tricks, then speed up the rest to keep the energy up.
- Cinematic Scenes: Add a dramatic touch to your movie-like clips by slowing down emotional or action-packed moments.
To enhance your cinematic clips further, learn the art of cinematic video editing in CapCut.
Conclusion
Speed ramping is an easy way to make your videos more exciting and professional-looking.
With CapCut, you can use the curve speed tool to adjust the speed at different parts of your video.
Whether you’re working on a vlog, action video, or cinematic scene, speed ramping will help your videos stand out.
Now that you know how to do it, go ahead and try speed ramping in CapCut. It’s a simple but powerful tool that will take your video editing to the next level!


