Are your videos a bit shaky? Don’t worry—you’re not alone! Many people have this problem, which can make videos look less cool.
But there’s good news! In this post, I’ll show you how to stabilize shaky videos in CapCut. CapCut is a free app that can help you make your videos smooth and steady.
With just a few taps, you can turn shaky clips into awesome, clear videos. Want to learn how? Let’s go through the easy steps to make your videos look great!
Why Stabilizing a Video is Important
Stabilizing a video makes it look smooth and clear, so viewers can focus on what’s happening without getting distracted by shaky movements.
“Stabilizing a shaky video makes it smoother and easier on the eyes for viewers.”
This makes the video more enjoyable to watch, especially if things are moving quickly. A steady video also looks more professional, helping the creator seem more trustworthy and skilled.
How to Stabilize Shaky Videos in CapCut
Step 1: Import Your Video
To start, open the CapCut App and tap on “+” to create a new project. This will open your gallery.

Choose the shaky video you want to fix, and it will load into the editor. Now, you’re ready to make your video smooth!
Step 2: Access the Stabilization Tool
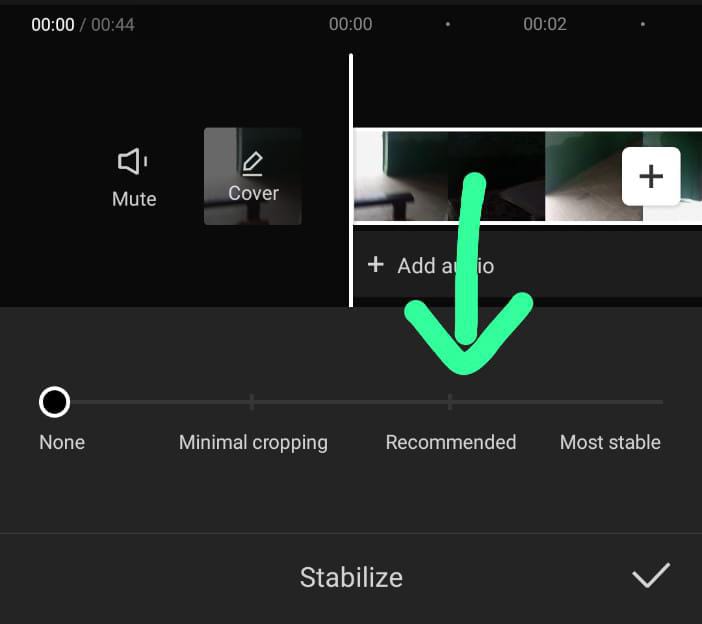
Next, tap on the video clip you imported. A menu will appear at the bottom. Swipe through the options until you find “Stabilize.”

This is the CapCut Stabilizer tool that helps stabilize shaky footage. Tap it to begin fixing your video.
Step 3: Adjust the Stabilization Settings
Once you access the stabilization tool, you’ll see options like “Minimal” and “Recommended.” Start with “Recommended” because it is my recommendation for the best results.

If your video still seems shaky, you can try other settings. Be careful not to overdo it, as too much stabilization can make your video look unnatural.
Step 4: Preview and Fine-Tune
Finally, tap the play button to preview your video. If it looks smooth, great! If not, you might need to fine-tune the settings or try a different stabilization option.
Adjust until your video looks just right.
And that’s how you stabilize shaky videos in CapCut!
Additional Tips for Better Video Stability
Use a Tripod or Stabilizer During Filming
To avoid shaky videos, start with a steady camera. Using a tripod or stabilizer keeps your camera still, helping you capture smooth footage right from the start. This is an easy way to get a more professional-looking video.
If you’re also interested in learning how to smooth out motion in your clips, check out our CapCut Slow Motion Tutorial for additional techniques.
Practice Smooth Movements
When you move the camera, do it slowly and smoothly. Quick or jerky movements can make your video shaky, even with the best tools. Practice gentle, steady motions to keep your footage stable.
These simple tips will help you create smoother videos, even before you start editing with CapCut!
For more advanced editing, you might want to see How to Remove Background Noise in CapCut to clean up your audio for a polished final product.
Conclusion
Now you know how to make shaky videos smooth in CapCut! Just follow these easy steps: import your video, use the CapCut Stabilizer tool, adjust the settings, and preview your work.
This will help your videos look smooth and professional. Don’t be afraid to try different settings to see what works best.
The more you practice, the better your videos will be. Have fun editing, and if you have any questions or tips, share them in the comments below!


5 thoughts on “How to Stabilize Shaky Videos in CapCut – 4 Easy Steps”